In today’s digital-first world, brands no longer want to spend blindly on advertising. They want measurable results. That’s exactly where Performance Marketing comes in — a results-driven approach where advertisers pay only when a specific action is completed, such as a click, lead, sale, or app install.
Unlike traditional brand marketing, performance marketing focuses on data, ROI, and accountability, making it one of the fastest-growing areas of digital marketing.
What is Performance Marketing?
Performance marketing is a pay-for-results digital marketing strategy. Instead of paying for visibility alone, advertisers pay only when users take measurable actions.
Common actions include:
- Clicks
- Leads
- Sales
- App Installs
Performance marketing is used across platforms like Google Ads, Meta Ads, Affiliate Networks, and Native Ads.
✅ Key advantage: Every rupee spent can be tracked, measured, and optimized for better returns.
Key Metrics in Performance Marketing
To measure effectiveness, marketers rely on a set of performance metrics:
- Impressions & Reach → Visibility of your ads
- CPC (Cost Per Click) → Spend per click
- CPM (Cost per Mille) → Cost per 1,000 impressions
- CPV (Cost Per View) → Spend per video view
- CTR (Click-Through Rate) → % of people who clicked
- CR (Conversion Rate) → % of people who took the desired action
- CPA (Cost Per Acquisition) → Cost to acquire one customer
- CAC (Customer Acquisition Cost) → Total spend per customer
- CPI (Cost Per Install) → Spend per app install
- ROAS (Return on Ad Spend) → Revenue per ad spend
- ROI (Return on Investment) → Profitability after all costs
- AOV (Average Order Value) → Average value per purchase
- LTV (Lifetime Value) → Revenue per customer over their lifecycle
These metrics help marketers track performance, allocate budgets smartly, and optimize campaigns for profitability.
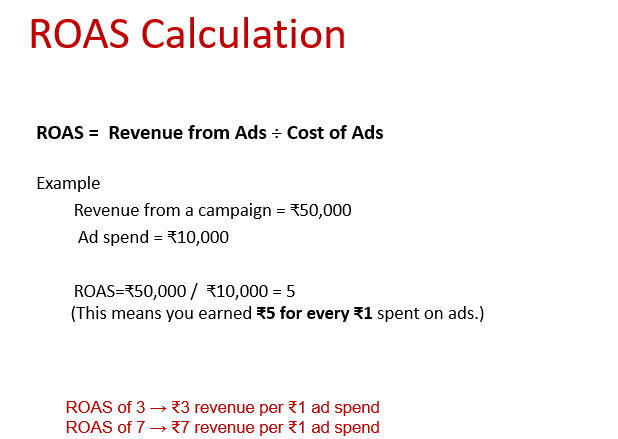
ROAS (Return on Ad Spend)
ROAS shows how efficiently ad spend is turning into revenue.
Formula:
👉 This means for every ₹1 spent, you earn ₹5.
ROAS < 1 → You’re losing money
ROAS = 1 → Break-even
How to improve ROAS:
Improve conversion rate (better landing pages, optimized funnel)
Use precise audience targeting
Reduce CPC through ad testing
Retarget potential customers
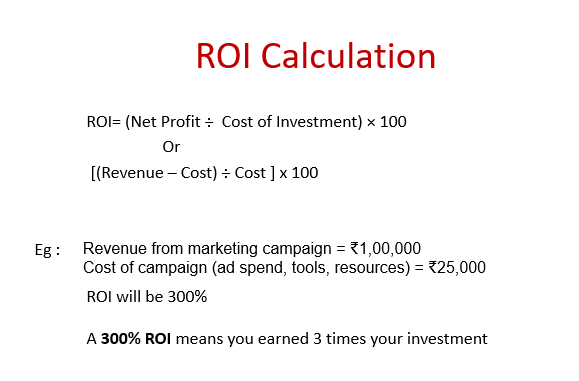
ROI (Return on Investment)
While ROAS focuses only on ad spend, ROI gives the bigger picture by including all marketing costs.
Formula:
👉 A 300% ROI means you earned 3x your total investment.
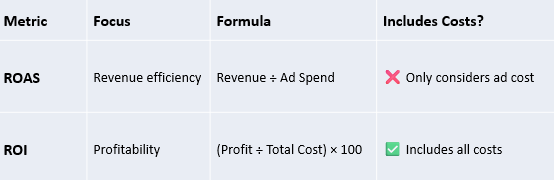
ROI vs ROAS: The Key Difference
Goals of Performance Marketing
The ultimate aim of performance marketing is to generate measurable results:
- Drive website traffic
- Generate qualified leads
- Boost online sales
- Retarget potential customers
- Increase app downloads
How to Optimize Performance Marketing
Optimization is what makes performance marketing powerful. Here’s how marketers fine-tune their campaigns:
1. Audience Optimization
- Use lookalike audiences
- Refine targeting by behavior & interests
- Retarget website visitors & cart abandoners
2. Landing Page Optimization
- Ensure fast loading speed
- Design mobile-first layouts
- Add clear and prominent CTAs
- Run A/B tests on different versions
3. Budget & Bidding Strategy
- Start with auto-bidding to learn
- Set CPA or ROAS targets
- Allocate more budget to high-performing campaigns
4. Funnel & Tracking Optimization
- Track micro-conversions (add-to-cart, sign-ups, video views)
- Use remarketing & email nurturing to recover drop-offs
- Install tracking pixels for accuracy
- Monitor with GA4, UTM tags, and CRM tools
Performance marketing isn’t about spending more — it’s about spending smarter. By focusing on ROI and ROAS, brands can measure every rupee, optimize campaigns, and scale only what works.
With the right mix of targeting, creatives, landing pages, and bidding strategies, businesses can maximize their growth, profitability, and long-term customer value.